
Why Basement Drop Ceiling Tiles Sag from Summer Humidity (And Fixes)?
When you notice your ceiling panels bowing downward during the hotter months, it is almost certainly a reaction to ambient moisture. Understanding why basement drop ceiling tiles sag from summer humidity (and fixes) is essential for anyone trying to maintain a finished lower level without constant upkeep.
This article explores the physics of mineral fiber absorption, the role of dew points, and the precise mechanical adjustments you can make to restore your ceiling’s integrity. By identifying the root causes of atmospheric moisture buildup, you can stop the cycle of sagging, staining, and potential structural decay that often plagues sub-grade living spaces.
The Physics of Mineral Fiber Absorption

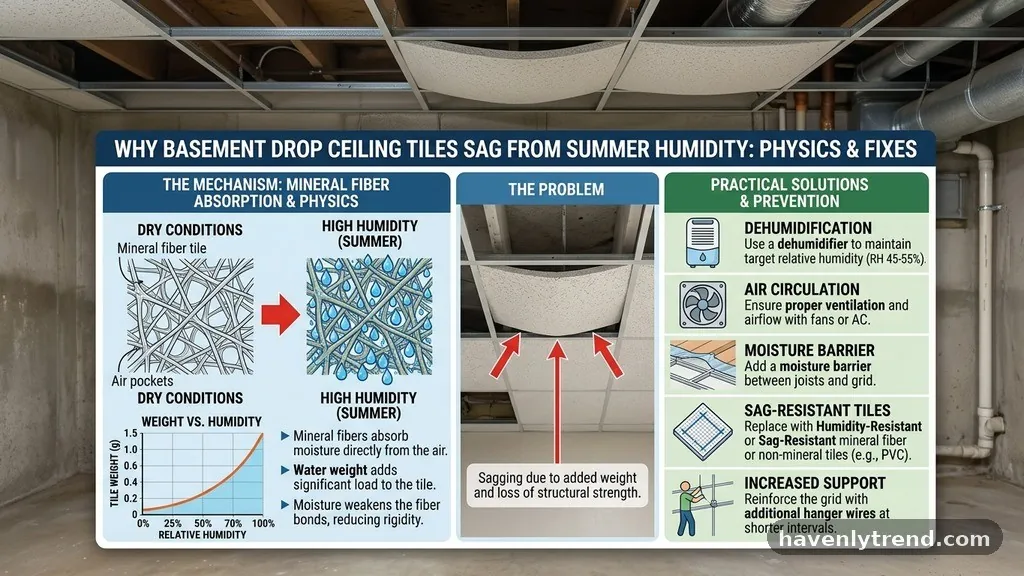
Most standard drop ceiling tiles are composed of mineral fiber, which acts like a giant sponge. When your basement experiences high humidity, these porous materials pull water vapor directly from the air.
As the internal structure of the tile absorbs this moisture, it loses its structural rigidity. The weight of the water, combined with the loss of tensile strength, causes the tile to warp and eventually sag under its own mass.
This process is exacerbated by the temperature differentials common in summer. Warm, humid air enters the basement and hits the cooler surfaces near the foundation walls.
When the dew point is reached, condensation forms on the tiles themselves. This localized liquid water accelerates the absorption process, leading to visible bowing within just a few days of a humid spell.
Why Humidity Levels Spike in Summer
Basements naturally stay cooler than the rest of the house, which creates a trap for humidity. When the outdoor air temperature rises, it holds significantly more moisture than cold air.
If you have any cracks in your foundation or gaps around window frames, this heavy, humid air infiltrates your basement. Once inside, the cooler basement air cannot hold as much moisture as the incoming air.
This phenomenon, known as relative humidity saturation, forces the excess water out of the air and onto your ceiling panels. Even if your basement does not have a major leak, the simple act of breathing in the humid summer air creates a microclimate that is far more aggressive than the conditions in your upstairs living areas. If you have poor ventilation, this moisture has nowhere to go, ensuring that your ceiling tiles remain perpetually damp throughout the peak summer months.
Identifying Early Signs of Moisture Damage

You rarely wake up to a completely failed ceiling; it is a gradual decline that starts with subtle indicators. The first sign is often a slight discoloration or yellowing of the white finish on the tiles.
These stains are caused by minerals being pulled through the material as water evaporates. If you see these spots, you are looking at the direct result of a moisture cycle that has already compromised the tile’s integrity.
You should also look for a slight “waving” in the grid lines or tiles that no longer sit perfectly flush with the metal tracks. If you press gently on a tile and it feels soft or spongy rather than firm, it has already absorbed too much water. Addressing these early signs before the tile loses its shape entirely can save you from having to replace the entire grid or individual panels.
The Role of Grid System Maintenance
Sometimes the problem isn’t just the tile; it is the metal grid supporting it. Over time, the humidity can cause the metal T-bars to oxidize or shift slightly.
If your grid is not perfectly level, the tiles will not seat correctly, creating gaps that allow even more moisture to circulate above the panel. You can check the level of your ceiling using a standard laser level or a long straight edge.
If the grid has sagged due to improper installation or weight stress, you may need to adjust the suspension wires. These wires are typically attached to the floor joists above.
A quick turn of the wire tensioner can often pull the grid back into a perfectly horizontal plane. Keeping the grid rigid and level is a crucial step in why basement drop ceiling tiles sag from summer humidity (and fixes) because a tight grid prevents the tiles from shifting and bending under their own weight.
Effective Dehumidification Strategies

The most reliable fix for ceiling sagging is managing the moisture source directly. A high-capacity dehumidifier is not just a luxury in a basement; it is a requirement for protecting your interior finishes.
You want a unit that is rated for the square footage of your basement and capable of removing at least 30 to 50 pints of water per day. Proper placement is vital, so ensure it is in an open area with good airflow.
For the best results, look for a model with an integrated pump or a gravity-fed drain. Emptying a reservoir tank manually is a chore that most people eventually stop doing, which allows humidity levels to creep back up.
By keeping your basement’s relative humidity below 50 percent, you prevent the tiles from ever reaching the saturation point that causes them to sag. You can monitor your progress with a simple digital hygrometer, which provides real-time data on the air quality.
Replacing Damaged Tiles with Resistant Materials
If your existing tiles are already warped beyond repair, you have the opportunity to upgrade to more durable options. Traditional mineral fiber tiles are the most susceptible to moisture, but they are also the most common due to their low cost. If you live in a high-humidity climate, consider switching to moisture-resistant alternatives.
There are many products specifically designed for basements that do not absorb water. These include:
- PVC or Vinyl Ceiling Panels: These are completely waterproof and will never sag due to humidity.
- Fiberglass-Based Tiles: These offer better moisture resistance than mineral fiber but still provide a traditional look.
- Metal Ceiling Tiles: These are an excellent choice for a modern aesthetic and are impervious to water damage.
- Acrylic Coated Tiles: These provide a thin barrier that prevents moisture from soaking into the porous core.
Comparing Ceiling Tile Material Performance

When you decide to replace or upgrade, it helps to understand how different materials handle the basement environment. This table provides a quick look at how various options compare regarding moisture resistance and longevity.
| Material Type | Moisture Resistance | Maintenance Level | Longevity |
|---|---|---|---|
| Mineral Fiber | Low | High | Short |
| Fiberglass | Medium | Medium | Medium |
| Vinyl/PVC | Excellent | Low | Long |
| Metal | High | Low | Long |
Insulation and Air Sealing Considerations
Often, the humidity in your basement is coming from the rim joists—the area where your house frame meets the concrete foundation. This is a common entry point for both cold air in the winter and hot, humid air in the summer. If you do not have adequate insulation in this area, you are inviting moisture to condense behind your ceiling tiles.
Applying spray foam or rigid foam board insulation to the rim joists is a highly effective way to stop this infiltration. By air-sealing these gaps, you prevent the humid outside air from ever reaching the space behind your drop ceiling. You can find detailed technical guidance on how to properly seal these areas through resources like the U.S.
Department of Energy insulation guidelines. This step significantly reduces the workload on your dehumidifier and keeps your basement environment stable.
Ventilation and Airflow Techniques

Stagnant air is the enemy of a finished basement. Even if you have a dehumidifier, you need to ensure that air is circulating through the entire space. If your basement has separate rooms or alcoves, the humidity can build up in these pockets, causing localized sagging in specific areas of the ceiling.
Installing a small exhaust fan or simply keeping internal doors open can help move the air toward your dehumidification unit. If you have a HVAC system that services the basement, ensure the vents are clean and unobstructed.
Some homeowners choose to install a dedicated return air vent in the basement to ensure the central system is actively scrubbing moisture from the air. Consistent airflow prevents moisture from settling on the cold surfaces of the ceiling grid.
Professional Repair vs. DIY Solutions
Most sagging issues can be managed with basic hand tools, but there are times when you should call in a professional. If you notice signs of heavy mold growth or if the ceiling sag is accompanied by water stains that indicate an active pipe leak, you need to address the structural issue before fixing the aesthetic one. Mold remediation is a specialized field that often requires protective gear and professional-grade cleaning agents.
For simple sagging, you can often perform the repairs yourself in an afternoon. This typically involves removing the affected tiles, checking the grid level, and installing new, moisture-resistant panels.
If you are uncomfortable working with electrical wiring or plumbing that might be hidden above the grid, a professional contractor can quickly resolve these issues. Always remember that the cost of preventing moisture damage is significantly lower than the cost of replacing a mold-damaged basement ceiling.
FAQ: Common Questions on Ceiling Maintenance
Can I paint my sagging tiles to hide the water stains?
Painting can hide the discoloration, but it does not fix the underlying moisture problem. Most standard ceiling paints are not designed for the flexible, porous nature of mineral fiber tiles. If the tile has lost its structural integrity, painting will only add weight and potentially cause it to collapse entirely.
How do I know if the sag is caused by a leak or humidity?
Leaks usually cause concentrated, dark brown stains and often lead to water dripping onto the floor. Humidity-related sagging is typically more uniform across the ceiling, appearing as a general bowing or warping of the tiles during the peak summer months. If the sag goes away or improves when you run a dehumidifier, humidity is the culprit.
Are there specific tiles that are guaranteed not to sag?
While no material is completely immune to extreme conditions, PVC and vinyl tiles are generally considered sag-proof. They do not absorb moisture, so they maintain their shape regardless of how high the relative humidity becomes in your basement. They are the standard for high-humidity areas like bathrooms and basements.
How often should I clean my drop ceiling grid?
You should inspect your grid at least twice a year—once before the summer humidity begins and once after it ends. Dust and debris can absorb moisture, so keeping the grid clean helps prevent rust. If you live in an area with particularly high humidity, a light cleaning with a damp, non-abrasive cloth can help remove trapped dust.
What is the most cost-effective way to fix a sagging ceiling?
The most cost-effective fix is to address the moisture at its source using a dehumidifier. If the tiles are already warped, replacing them with moisture-resistant fiberglass or vinyl tiles is a better long-term investment than buying more of the same mineral fiber tiles that failed in the first place.
Final Thoughts on Humidity Management
Addressing the reasons why basement drop ceiling tiles sag from summer humidity (and fixes) is a matter of controlling your environment. By managing moisture levels, ensuring proper grid alignment, and opting for resistant materials, you can enjoy a dry and stable basement ceiling throughout the year. Don’t wait for your ceiling panels to fail completely before taking action.
Start by installing a reliable dehumidifier and inspecting your rim joists for air leaks today. Taking these proactive steps will preserve your investment and keep your lower level comfortable regardless of what the summer weather brings. If you have specific concerns about your basement’s layout, consider consulting a local contractor to identify any unique moisture pathways in your home.